
Develop Conference talk write-up: ‘Why User Experience Design is a Must for Games’
In Gamedesign, UXdesignLast week at Develop Conference in Brighton, Martin Darby (one of my business partners at Strike Gamelabs) and I did a talk called ‘Why User Experience Design is a Must for Games’.
Several people asked us for copies of the slides, so this article is a write up of the talk and the key points we made.
The first few pages are an overview about UX Design, the second part is the 6 step process that we have developed and use for our games.
If you have any further questions or want to chat about UX please drop me a line at ella@ellaromanos.com.
What is User Experience (UX) Design?

UX design is about considering what your users want to do, rather than what is the easiest way to make the game.
It’s not primarily about the aesthetics either, that should be pretty much the last step of your process as it is merely a skin for the functionality that you should be designing.
A good UX design should help artists and programmers to do their job. For artists you should be giving them a blueprint to work from, for programmers they should have a more complete picture of what they need to build, and how the game needs to work.
UX design originated in more application-orientated software, and proliferated as computer usage became more widespread with personal computers and then the Internet, Simply because people needed to be able to use relatively complex software without extensive training or time investment.
Games can also be pretty complex these days, social games are UI heavy, as are MMO’s, and RPG elements continue to cross-pollinate other genres. We got away with not undertaking UX design for a long time because until recently gamers were more ‘core’ and expected to have to take time to learn the systems. We don’t have that luxury anymore, and we should be making the effort to ensure our games are as easy to use as possible to engage and retain our users.
But even simple is complicated, and without undertaking a sometimes extensive UX design process, making your game easy to use and understand is difficult.
It’s important to note that UX design acknowledges rapid prototyping and user testing as a core part of the process – leaving these out is not an option.
What makes a good UX Designer?

Unlike pure game design, the focus for UX design is on elegance rather than fun. This is a very bottom up rather than top down discipline. Therefore game designers do not necessarily make the best UX designers.
UX design requires systems thinking and there is a certain degree of rigor and process, as every tiny detail matters. This means that programmers often learn to be good user experience designers, however with one caveat – in our experience, don’t ever have the same personal doing the UX design and programming on a project. This is because programming is naturally about finding the quickest way to achieve something, whereas UX design is about finding the best solution for the user.
UX design should also encapsulate all other disciplines, game design, programming, art etc. Therefore the UX designer must be a good communicator and must understand those other disciplines and the production process.
How to start implementing it in your studio?

Firstly, we must escape the notion that UI is a minor or boring part of the games development that gets thrown in somewhere along the line, or at the end.
UX design should be the structure within which you design your games, not another part of the process.
You also need to bring user testing and prototyping into the process as early on as possible.
UX Design Step Process

We follow a simple step process which we believe can be applied to any game. This process is fundamentally a way of thinking, and gives you a framework to make sure you think things through carefully and don’t miss anything. Following the steps is fairly easy, the skill comes in effectively breaking things down as simply as possible for your game.
This is a basic overview of the steps, so if you do a lot of UX design you probably know this, but hopefully there are some useful tips! If you don’t do UX design, you probably do bits of some of these steps anyway, but the framework should be useful to make sure you don’t miss anything.
This process is led by the UX designer, but you will also want to pull in your game designer, UI artist and probably lead tech at points.
In terms of software, we use a mixture of Omnigraffle (mac only – more comprehensive but more expensive) and Balsamiq (PC/mac – cheaper and simpler – great for flow diagrams, not so great for wireframes).
We actually use this process as a framework for our game design documents and pitches too. Because you are breaking things down step by step, it’s a great way to communicate a design, both internally to your team, and externally to stakeholders like publishers or investors.
Don’t forget this process is:
– Iterative
– Requires systems thinking – detailed, precise, definitive
Step 1: Defining projects goals and user needs

This is something that everyone does when planning a game. It’s partly your executive summary and partly market research. However, it’s important to highlight this as the first step, and why these things are so important for a UX process.
Some examples:
1. Knowing who your audience is – their age, what type of games they play, are they core or casual gamers… In UX terms, this is essential for understanding the users expectation of a game, what they want from a game, how long they will play for in a session and how long you are likely to retain them as a user.
2. Focused research into competitor games is important to see what standards people expect from these games, what the common issues and pitfalls can be and how you might be able to improve them. A key point when looking at competitor games is not to try and reinvent the wheel just because you can; don’t change things because you want to be original or do something new. Only change things if it makes them better and even then think carefully – even if you have a better solution, if there is an established convention, it may not go down well with your users because of the standards they have become accustomed to.
3. Knowing your target platform is obviously important to know the interaction methods you can use and if it’s multi-platform, or might be in the future, then that needs considering because you may need to decide between one user interface that works across all platforms (and making some compromises accordingly), or having different user interfaces for each platform.
4. Understanding the technical specification of the game is important too. Things like multiplayer or online features may mean that you have some limitations that you need to take into account.
5. Last but not by any means least is monetisation methods. This does affect how you draw people into the game so needs to be considered early.
Step 2: Defining features

The second step is to define what you think all your features are i.e. what the main tasks for your users to undertake throughout the game.
The best way to make my point here is to describe an example: Say you were building a tycoon type game, say Pocket Planes, your key features would probably include:
– Move people/cargo
– Earn rewards
– Buy airports
– Upgrade planes
– Join a flight crew (social)
– Events
This step sounds simple, but defining features for your game is often extremely time consuming because the trick is reducing all of your ideas down to a concise feature set.
Usually you start with a lot more ideas that you need and a good way to do this is a brainstorming session with the whole team, with everyone putting post it notes up on board of the features that should be in the game.
Once this has been done you then you do two things:
1. Remove the ones you don’t actually need – You always have lots of great ideas, but not every feature can or should go in. Personally I tend to try and keep to around 7 features in total, but I would be wary of going above 10.
2. Group the remaining ones where you can – Often what you think are single features can be grouped into a larger single feature – for example, you might have thought of features such as ‘stats’, ‘awards’, ‘score system’ and ‘currency’, all of which can be grouped under the feature ‘earn rewards’.
Going from a huge list of ideas to your feature set is not easy, and will take some time (and debate!), but remember you can always add more features later, post release or if you have more time – but starting with too many will risk making a game that users won’t understand, and that you don’t have time to build!
Step 3: Creating game loops and user flows

By this point you should know what it is your want to make and be ready to start really looking at your UX design.
The core game loop
I like to keep things simple, so what we do first is define core game loop.
The key things to consider while doing this are:
1. The loop should be a single loop, no arrows going between to create multiple or split loops. This isn’t because the game won’t allow players to access the different feature in whatever order they want, but this is the CORE game loop… This is how you guide your player though the game and the flow that they have through it, to advance through the game. The fact that they can then go back and access bits in different orders is irrelevant. This may sound obvious, but when I’ve taught people this process, this is almost always the biggest stumbling block.
2. It is essential at this point to simplify everything down to the bare minimum, but it’s very easy to start thinking it’s more complicated than it is. Generally your loop should be 3-5 elements from your features list that you created in the previous step, but as a general rule not all of the features from that list need to be included. The main objective of this section and the greatest challenge is to work out which ones should be there.
The best way I have found to think about the core game loop is that although its not everything that the player can do in the game, it’s what they will do on their first play session, or to the point where they start repeating actions.
Going to back to pocket planes, my previous example, I would argue that our core loop would be: Move people/cargo – earn rewards – upgrade planes – buy airports
Personally, I wouldn’t put flight crew or events in there as I think those are secondary features. The game could launch without them, and more importantly they are not essential to playing, enjoying or completing the game.
The reason we use the term ‘loop’ is that the player goes back to the start, and repeats the gameplay over and over…. this is in essence is the game, even though the player might do things in a different order, they might upgrade planes several times, or buy airports or whatever, but progressing through that loop is how they move forward.
The other useful thing about this step is that it then informs your tutorial/first play session – you now know, in a very simple format, what they need to do in the first few minutes of gameplay to feel rewarded and understand the game.
Loops within loops

Once you have done your core loop, you then do another loop for each of the features in your core game loop. Depending how complex your game is, you may go and do loops within those loops… until you have got to all the key actions that players have to do to complete the loop.
So for example, in pocket planes again, to move people/cargo, the loop would be: choose plane – choose cargo/people – choose route – fly
You can then do some loops for your other features from your original features list (e.g. flight crew and events in the case of Pocket Planes).
User flows
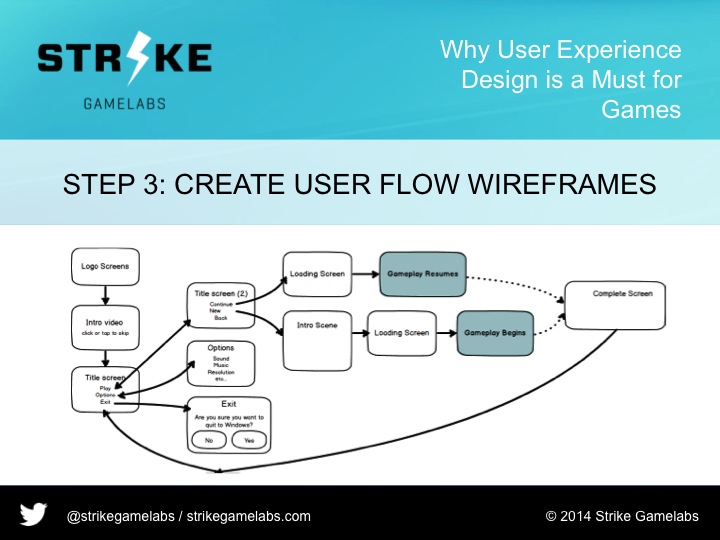
The last part of this stage is to define the flow of your game screens.
Now you know all the loops, you should know what screens you need. We are not at this stage mapping out buttons or what is on each screen. We are simply identifying what screens exist, and how users move through them.
You may do a full user flow of every screen including gameplay, or you may split them up to focus a user flow on the menu screens, and have separate flows for the gameplay. It depends what works for you and your game – different genres and sizes of games affect this too.
Summary
Although I haven’t worked on AAA games, I have done some work on MMOs but my experience is mostly in smaller games. I believe this approach can be applied to pretty much all games. I don’t think it matters how big or complex your game is, it will just mean you have more layers of loops, rather than the loops being much more complex. If you think your loops should be more complex, it probably means you don’t understand your game enough – and if you don’t, your users won’t either. Simple is complicated… and this step of the process is the key to creating an effective UX design.
Step 4: Creating the Wireframes

Once you have all of your screens mapped using loop and then flow diagrams, you should know exactly what screens you will have, and what your HUD will need to include, so you can start wireframing it all up.
For each screen, or item in your flow, start to plot out what those screens look like functionally. Where things are, how you interact with them, what happens when you interact with each item. Nothing should be placed or designed without a reason, because you should already know exactly what you need.
These wireframes will often have flows within them to join them all together, or may in some cases you may want to put some accompanying text notes. You will also probably need flows showing how functionality works within a screen, i.e. what happens when a button is pressed.
At the end of this process, you will have a lot of diagrams! But you should have a blueprint for your UI artist to work from, and also should know exactly how your game needs to be built for your developers.
Step 5: Visual treatment
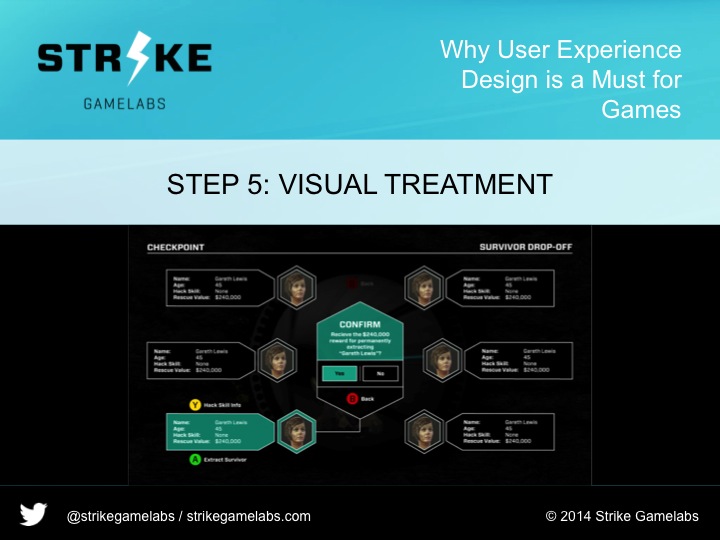
This is where things starts coming together; A 2D or UI artist creates the screens from the wireframes, basically making them look pretty.
Even if you have worked with your UI artist for a long time the UX designer and UI artist have to work closely together, iteratively, to ensure the games UI works well. I worked with our UI artist for many years and he knows exactly what I mean when I put things down but we still chat about the design and iterate a lot. This just goes to show how much communication back and forth is required especially if you have not worked much with your UI artist in the past. They will have valuable input into your designs, so iterating between functional and form is an extremely useful process.
Step 6: Implementing and testing

Going through these steps fully should enable you to compile a document defining how the game should work functionally. Along with the game designer you should be able to provide clear instructions to programmers and artists to build the game.
However, we all know that any creative process is iterative and cannot all be designed perfectly upfront. With game design, some people even question whether you should write design documents. We would argue that the document should focus on the UX, and be structured within this. You should design the whole game upfront, but you should also expect it to change.
However the reason you have to design upfront is that as you iterate and change things through development, you can keep updating documents and diagrams as you go so that you consider the entire flow and don’t break something when changing something else. The UX designer should always lead this, if someone suggests a change, the UX designers role is to take that idea, and check it against the designs before it is implemented.
The earlier you can do user testing as well the better, If you can, doing small prototypes of key bits, including A/B testing if you can’t decide what design would work best for a feature. You can do this yourself, but you can also use experts in this such as Player Research. We’ve worked with them and I would recommend investing the time and cost incurred here. They will add a lot to your UX process, giving a different angle and insight into your UX design, and do extended, effective user testing.
There is even a possibility you can even do prototyping and testing without even using a computer. Paper prototyping is a good option or even Lego, whatever you can get that works, although this does depend somewhat on the game, but the quicker and lower cost you can prototype and test, the better!
Summary
Just to summarise the key points of this talk:
– The key to UX is simplifying and simplifying again.
– It’s easy to think your game is complex, but to communicate your game to your user effectively you need to be able to simplify it down.
– This is a very detailed process, nothing should be done without a reason for it.
– Don’t reinvent the wheel unnecessarily, understand your users and the space you are working in.
– Having an established process like this is useful if simply to make sure you don’t miss anything, which can cost time and money once you start development, or release the game.
– This can be a great framework for game design documents.
– Iteration is key, as is user testing
——————